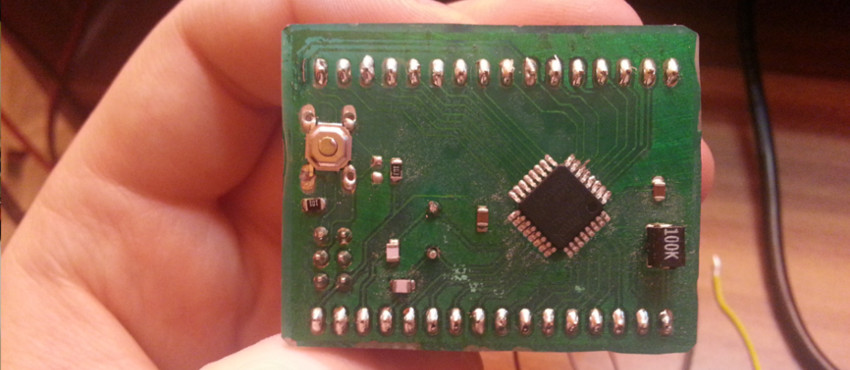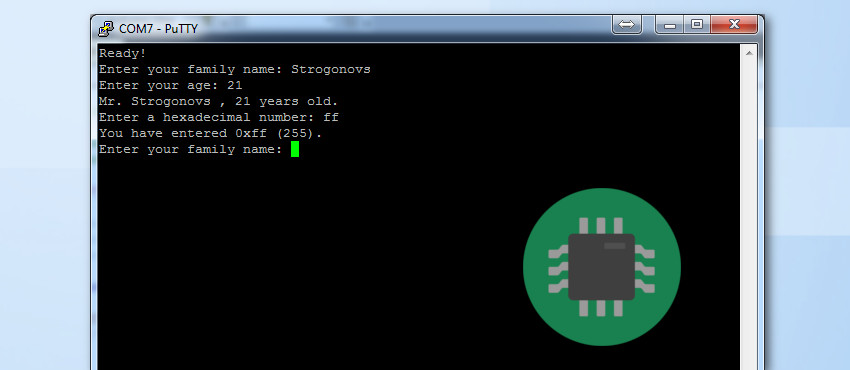
Most of my projects involves having some sort of communication between PC and my micro. Either useful data is being transmitted between those two, or just for the sake of debugging, since I don't have any of the high end AVR debugging tools. Whatever reason, serial communication is always useful and I view it as a must have and very important module of any micro. In this article I'll be describing how to set up serial communication with XMEGA, also how to use standard printf and scanf functions in your C and C++ code. I won't be explaining what is a USART, I expect you to already be comfortable with the theory behind it and I'll leave out interrupts.
Initializing USART
So the first thing to do when setting up serial communication is to specify the baudrate. In this example I'll be using 32MHz as my system clock, and I'll do my best to show how to calculate the BSEL value, even though page 284 in datasheet there is a table of available BSEL values for that system clock.
See table below for equations for calculating BSEL value:
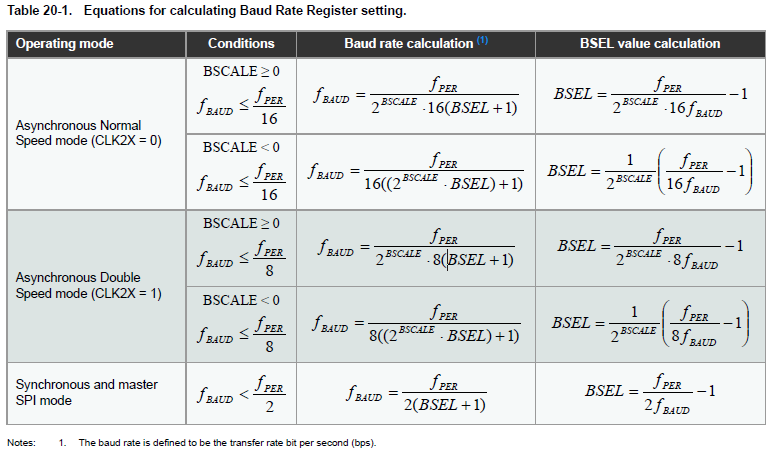
Let's say our desired baudrate is 9600, which is very common. I personally always try out, if I can get a decent BSEL value in normal speed mode, basically when CLK2X = 0. Also I won't be using BSCALE < 0, so from that I already know which two equations I'll be using:

By the way, BSCALE is a value between -7 to +7. You can view it as additional way of tweaking the actual baudrate to match the desired output (9600) as close as possible.
For now I'll assume I don't need any tweaking, and I'll set my BSCALE to 0.

Since we can only use integers for selecting baudrate, our BSEL value would actually end up as 207. Due to this reason inevitably we won't have exact baudrate. But we can calculate the actual baudrate with the first equation from the pair.

In this case we have close enough value to the 9600, only differs by 0.16%. We shouldn't have any problems with serial communication.
Recap: we chose BSCALE to be 0 also we chose BSEL to be 207.
Those two group of bits are located in registers BAUDCTRLA amd BAUDCTRLB. See page 294 in datasheet for more details.
The code should look similar to this:
USARTC0_BAUDCTRLB = 0; //Just to be sure that BSCALE is 0
USARTC0_BAUDCTRLA = 0xCF; // 207
After we have selected our baudrate we have to configure the configure the usual properties of serial communication like: chunk size, stop bits, parity bits.
That is done in CTRLC register for USART. See page 291 in the manual for more details.
I'll be using 8 data bits, asynchronous USART, with one stop bit and no parity bits, by following datasheet you should be only changing CHSIZE bits, and end up something similar to this:
USARTC0_CTRLC = USART_CHSIZE_8BIT_gc;
Final step in setting up the USART is to enable the corresponding functions in CTRLB register:

For now we are interested in two bits RXEN and TXEN, which stands for recieve enable and transmit enable. However, for higher baudrates you might need to set bit CLK2X as well, remember you could switch between USART clock speed when calculating the baudrate? You'll see in the full code below, that I chose to use USART with baudrate of 115200, where I enabled CLK2X.
//Enable receive and transmit
USARTC0_CTRLB = USART_TXEN_bm | USART_RXEN_bm;
That's it! You have successfully setup the UART! By now your code should look something like this:
void setUpSerial()
{

    // Baud rate selection
    // BSEL = (32000000 / (2^0 * 16*9600) -1 = 207.333 -> BSCALE = 0
    // FBAUD = ( (32000000)/(2^0*16(207+1)) = 9615.384 -> it's alright

    USARTC0_BAUDCTRLB = 0; //Just to be sure that BSCALE is 0
    USARTC0_BAUDCTRLA = 0xCF; // 207


    //Disable interrupts, just for safety
    USARTC0_CTRLA = 0;
    //8 data bits, no parity and 1 stop bit
    USARTC0_CTRLC = USART_CHSIZE_8BIT_gc;

    //Enable receive and transmit
    USARTC0_CTRLB = USART_TXEN_bm | USART_RXEN_bm; // And enable high speed mode
}
Remapping RX/TX pins
A nice feature available in xmega architecture is that you can change default pins to different pair of pins. By default TX for xmega16e5 is PC3 and RX is PC2. We are able to change them to PC7 and PC6 accordingly. You can see the PORTC pin function in table below:
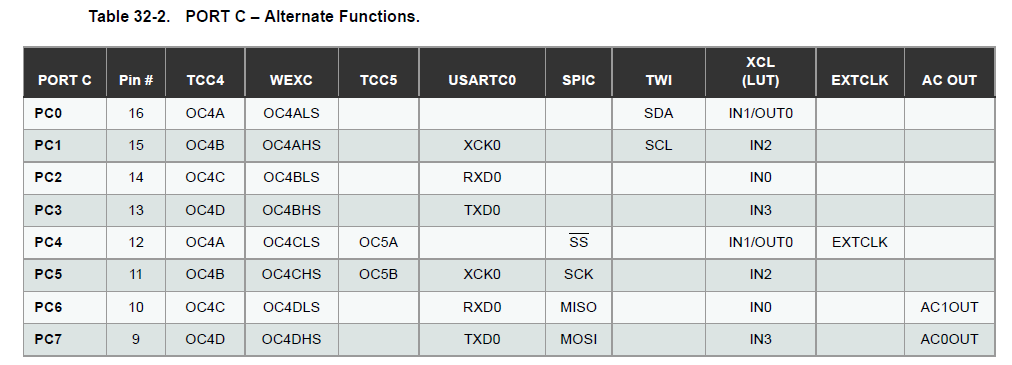
Every group of ports have a REMAP register, and just by following the instructions in the register you can switch between the alternative functions of the pins in the corresponding port. Below you can see REMAP register for PORTC in xmega16e5:

Basically you just have to set the USART0 bit to 1, to use the alternative RX/TX pins. That would translate to code something like this:
//For the sake of example, I'll just REMAP the USART pins from PC3 and PC2 to PC7 and PC6
PORTC_REMAP |= 0x16; //See page 152 in datasheet, remaps the USART0

PORTC_OUTSET = PIN7_bm; //Let's make PC7 as TX
PORTC_DIRSET = PIN7_bm; //TX pin as output

PORTC_OUTCLR = PIN6_bm;
PORTC_DIRCLR = PIN6_bm; //PC6 as RX
Reading and writing to serial
Writing to serial
There is nothing really special about writing to serial. First you wait until DATA register is empty, either previous transmission has been sent or the data has been read after receiving it. And then just put the data you want to send in the DATA register.
A flag DREIF will be set when DATA register is empty. The bit is located in USART STATUS register. For more details please see page 278 in the manual
Following from the very brief explenation, the code for sending one char should look like this:
void sendChar(char c)
{

    while( !(USARTC0_STATUS & USART_DREIF_bm) ); //Wait until DATA buffer is empty

    USARTC0_DATA = c;

}
And if you want to send string of characters, I normally use the following approach:
void sendString(char *text)
{
    while(*text)
    {
        sendChar(*text++);
    }
}
Sample usage:
int main(void)
{
    setUpSerial();

    while(1)
    {
        _delay_ms(3000);
        sendString("Hello World!\n\r");
    }
}
Reading from serial
Essentially, reading from serial is the same as for writing to it. You use the same data register, only you check different flag in the STATUS register. From datasheet I did understood that I should be checking DRIF flag when data is ready to be read, however it wasn't the case. The code would loop for ever when trying to read the data. I did find that RXCIF flag works.
char usart_receiveByte()
{
    while( !(USARTC0_STATUS & USART_RXCIF_bm) ); //Interesting DRIF didn't work.
    return USARTC0_DATA;
}
A common approach is to receive data using interrupt routine.
Using printf and scanf with serial
One of the most useful methods of using serial is to use standard C functions printf and scanf. It's actually not that hard to enable them. You just have to provide two functions, one for receiving data and one for transmiting. Essentially we have already done them, and with slight modification we can forward them to stdin and stdout. The way you override stdin and stdout slightly changes depending whether you use C++ or C. I'll show the differences later on.
Function for printf (stdout)
I'm not going to elaborate much on these functions, I belive they are self explanatory.
static int uart_putchar (char c, FILE *stream)
{
    if (c == '\n')
    uart_putchar('\r', stream);

    // Wait for the transmit buffer to be empty
    while (  !(USARTC0_STATUS & USART_DREIF_bm) );

    // Put our character into the transmit buffer
    USARTC0_DATA = c;

    return 0;
}
Function for scanf (stdin)
int uart_getchar(FILE *stream)
{
    while( !(USARTC0_STATUS & USART_RXCIF_bm) ); //Wait until data has been received.
    char data = USARTC0_DATA; //Temporarly store received data
    if(data == '\r')
        data = '\n';
    uart_putchar(data, stream); //Send to console what has been received, so we can see when typing
    return data;
}
That's all the functions you need to provide to stdin and stdout.
As I mentioned before it slightly differs the way you override stdin and stdout in C++ and C. However, AFAIK you should be able to use C++ method in C.
For C++
extern "C"{
    FILE * uart_str;
}

int main(void)
{
        setUpSerial();
    //Overwrite standard stdout;
    uart_str = fdevopen(uart_putchar, uart_getchar); //send , receive functions
    stdout = stdin = uart_str;

    printf("Ready!\n");

       while(1)
       {
                char str [80];
        int i;
        printf ("Enter your family name: ");
        scanf ("%79s",str);
        printf ("Enter your age: ");
        scanf ("%d",&i);
        printf ("Mr. %s , %d years old.\n",str,i);
        printf ("Enter a hexadecimal number: ");
        scanf ("%x",&i);
        printf ("You have entered %#x (%d).\n",i,i);
    }
}
For good old C
FILE usart_str = FDEV_SETUP_STREAM(uart_putchar, uart_getchar, _FDEV_SETUP_RW);

int main()
{
        setUpSerial();
    stdout = stdin = &uart_str;
    printf("Ready!\n");
    while(1)
    {
        //PORTA_OUT = ~PORTA_OUT;
        _delay_us(50);
        //_delay_ms(3000);
        //sendString("Hello Sissy!\n\r");
        int raw = readADC();
        // See datasheet page 345
        // VCC/1.6 = 3.3 / 1.6 = 2.0625
        // dV = 2.0625 * 0.05 = 0.135
        // Voltage = (reading * 2.0625 / 4096) - 0.103
        double volts = (raw * 2.7/ 4096.0f) - 0.135f;

        //printf("Raw: %d -> Volts: %f\n\r", raw, volts);
        char str [80];
        int i;
        printf ("Enter your family name: ");
        scanf ("%79s",str);
        printf ("Enter your age: ");
        scanf ("%d",&i);
        printf ("Mr. %s , %d years old.\n",str,i);
        printf ("Enter a hexadecimal number: ");
        scanf ("%x",&i);
        printf ("You have entered %#x (%d).\n",i,i);
    }
}
Enabling floats in printf
By default atmel has disabled float support in printf. To enable it you have to link to a different library. As far as I understand, it is disabled for optimization reasons. In any case, just by including stdio library, the application is considerably bigger, I only use printf and scanf when debugging. Afterwards I disable it.
In any case to enable floats in printf in Atmel Studio 6 go to your project properties. In your menu Project -> (Your project) Properties
and check "User vprintf library (-Wl, -u, vfprintf)"

And in libraries add printf_flt
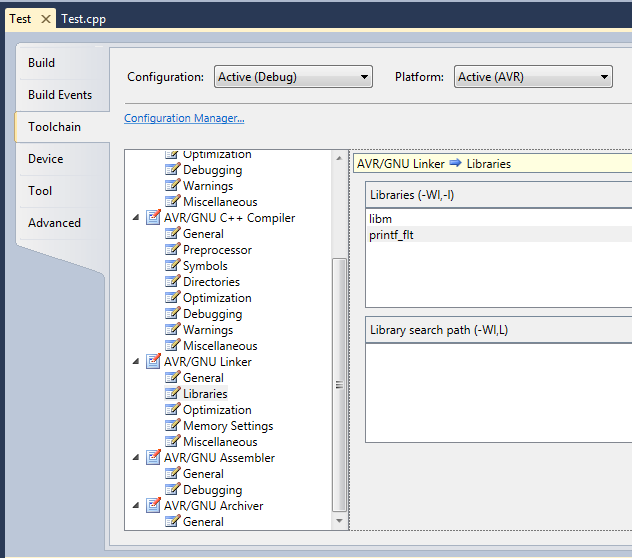
That's it, just recompile you application and upload to the micro. It should now have fully functional printf. Note: if possible I would suggest to use printf_P instead of printf. It's much more optimized.
Everything together
#define F_CPU 32000000UL

#include <avr/io.h>
#include <util/delay.h>
#include <stdio.h>

static int uart_putchar(char c, FILE *stream);

extern "C"{
    FILE * uart_str;
}


void setUp32MhzInternalOsc()
{
    OSC_CTRL |= OSC_RC32MEN_bm; //Setup 32Mhz crystal

    while(!(OSC_STATUS & OSC_RC32MRDY_bm));

    CCP = CCP_IOREG_gc; //Trigger protection mechanism
    CLK_CTRL = CLK_SCLKSEL_RC32M_gc; //Enable internal  32Mhz crystal


}


void setUpSerial()
{
    //For the sake of example, I'll just REMAP the USART pins from PC3 and PC2 to PC7 and PC6
    PORTC_REMAP |= 0x16; //See page 152 in datasheet, remaps the USART0

    PORTC_OUTSET = PIN7_bm; //Let's make PC7 as TX
    PORTC_DIRSET = PIN7_bm; //TX pin as output

    PORTC_OUTCLR = PIN6_bm;
    PORTC_DIRCLR = PIN6_bm; //PC6 as RX


    // Baud rate selection
    // BSEL = (32000000 / (2^0 * 8*115200) -1 = 34.7222 -> BSCALE = 0
    // FBAUD = ( (32000000)/(2^0*8(34+1)) = 114285.71 -> it's alright

    USARTC0_BAUDCTRLB = 0; //Just to be sure that BSCALE is 0
    USARTC0_BAUDCTRLA = 0x22; // 207


    //Disable interrupts
    USARTC0_CTRLA = 0;
    //8 data bits, no parity and 1 stop bit
    //USARTC0_CTRLC = USART_CMODE0_bm | USART_PMODE0_bm | USART_CHSIZE_8BIT_gc;
    USARTC0_CTRLC = USART_CHSIZE_8BIT_gc;

    //Enable receive and transmit
    USARTC0_CTRLB = USART_TXEN_bm | USART_CLK2X_bm | USART_RXEN_bm; // And enable high speed mode

}

void sendChar(char c)
{

    while( !(USARTC0_STATUS & USART_DREIF_bm) ); //Wait until DATA buffer is empty

    USARTC0_DATA = c;

}

void sendString(char *text)
{
    while(*text)
    {
        sendChar(*text++);
    }
}

static int uart_putchar (char c, FILE *stream)
{
    if (c == '\n')
    uart_putchar('\r', stream);

    // Wait for the transmit buffer to be empty
    while (  !(USARTC0_STATUS & USART_DREIF_bm) );

    // Put our character into the transmit buffer
    USARTC0_DATA = c;

    return 0;
}

char usart_receiveByte()
{
    while( !(USARTC0_STATUS & USART_RXCIF_bm) ); //Interesting DRIF didn't work.
    return USARTC0_DATA;
}

int uart_getchar(FILE *stream)
{
    while( !(USARTC0_STATUS & USART_RXCIF_bm) ); //Interesting DRIF didn't work.
    char data = USARTC0_DATA;
    if(data == '\r')
        data = '\n';
    uart_putchar(data, stream);
    return data;
}


int main(void)
{


    setUp32MhzInternalOsc();
    setUpSerial();

    //Overwrite standard stdout;
    uart_str = fdevopen(uart_putchar, uart_getchar); //send , receive functions
    stdout = stdin = uart_str;


    printf("Ready!\n");
    while(1)
    {
        char str [80];
        int i;
        printf ("Enter your family name: ");
        scanf ("%79s",str);
        printf ("Enter your age: ");
        scanf ("%d",&i);
        printf ("Mr. %s , %d years old.\n",str,i);
        printf ("Enter a hexadecimal number: ");
        scanf ("%x",&i);
        printf ("You have entered %#x (%d).\n",i,i);
    }
}
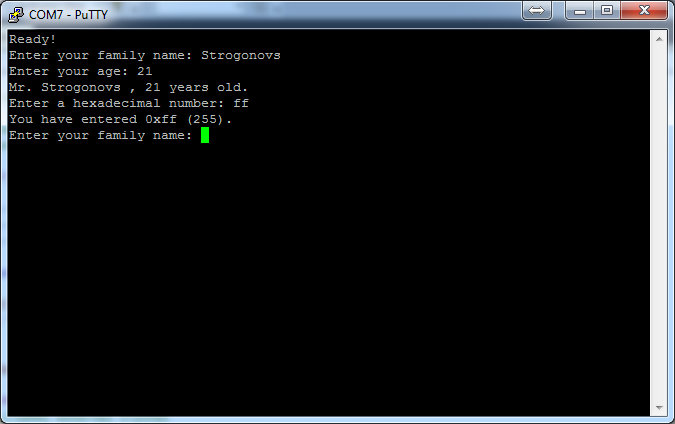
References:
Atmel. (2012). Library reference. Available: http://www.nongnu.org/avr-libc/user-manual/group__avr__stdio.html. Last accessed 09/03/2014.
Admin. (2011). Using standard IO streams in AVR GCC. Available: http://www.embedds.com/using-standard-io-streams-in-avr-gcc/. Last accessed 09/03/2014.
Frank. (2010). Atmel Xmega printf HowTo. Available: http://blog.frankvh.com/2009/11/14/atmel-xmega-printf-howto/. Last accessed 09/03/2014.
Atmel. (2013). XMEGA E MANUAL. Available: http://www.atmel.com/Images/Atmel-42005-8-and-16-bit-AVR-Microcontrollers-XMEGA-E_Manual.pdf. Last accessed 09/03/2014.
Atmel. (2013). ATxmega32E5 / ATxmega16E5 / ATxmega8E5 Preliminary. Available: http://www.atmel.com/Images/Atmel-8153-8-and-16-bit-AVR-Microcontroller-XMEGA-E-ATxmega8E5-ATxmega16E5-ATxmega32E5_Datasheet.pdf. Last accessed 09/03/2014.
