Recently I assembled a PCB I designed with the latest revision of nRF51822AC, and for my surprise the code I wrote on BLE400 development board just doesn’t work on the new platform. My main concern is that I never really figured out have to use Qt’s QBS to separate compilation of C files with GCC and CPP files with G++.In addition because I don’t properly compile the application, it seems that the G++ screws with the memory addresses regarding C code. Long story short, I realised that Qt Creator can also make use of Makefile directly in the IDE. Best part, it is extremely simple to setup, even with debugging. In this article I will go through what I changed in the nRF51 makefile to be able to compile CPP files and have two versions of release and debug for Qt Creator to compile. If you’re a hardcore compiler and makefile guru, this article probably is not for you.
Perquisites
Before we begin, let’s just make sure we are on the same page regarding the environment. I will be using nrf51822AC as my µC. Also I’ll be using the newest available SDK at the time of writing, which is the SDK 11. Note that their example comes with softdevice S130. Which from my understanding is now just a combination of S110 and S120 in one package. Instead of using jLink as my programmer, I’ll be using my ST Nucleo platform which has an on-board ST Link v2. For my debugging and flash writing I’ll be using OpenOCD. The jLink steps are not in any way different from my previous tutorials regarding QBS and Qt Creator, you can look up the configuration there.All examples on what I altered will be based on SDK11 blinky example, which is located in sdk11/examples/peripherals/blinky
Switch between release and debug mode
Before we move on to Qt Creator we shall configure the Makefile to include two versions to compile: release and debug. If you’re not aware of the concept, simply put, the debug version will also compile a lookup table of the code, so if your application crashes the debug server will be able to tell you in which file and which line number the crash occured. You know the usual debugging magic.
Optimization switch
First let’s see how we are able to control level of optimization.
The “-O” regulates how much optimization will be performed on the code. Not going into too much details -O0 (also being the default one) will not perform optimization and is good for debugging purposes while -O1, -O2, -O3 will increasingly do more, or at least try to do more code optimization and reduction. -O3 being the most aggressive one. Normally for release mode you want -O3.
There are more options available for optimization, if you want to see them all and exactly what flags are switched on and off you can refer to GCC documentation here
Debugging options
The other flag we must alter between the release and debug mode is the “-g” flag, which basically just tells the compiler how much information it should retain for debugging. It is mandatory to set this flag for debug version, otherwise you won’t have the “lookup table” and if you pause your code somewhere it will just show you the location in assembly.
Nonetheless, there are generally 4 levels of debugging -g to -g3. Here is an excerpt of the documentation:
Request debugging information and also use level to specify how much information. The default level is 2. Level 0 produces no debug information at all. Thus, -g0 negates -g.
Level 1 produces minimal information, enough for making backtraces in parts of the program that you don't plan to debug. This includes descriptions of functions and external variables, and line number tables, but no information about local variables.
Level 3 includes extra information, such as all the macro definitions present in the program. Some debuggers support macro expansion when you use -g3.
You can view full documentation about g level switching here
For our purposes we shall be using the -g3 flag.
Altering Makefile
Now that we know what flags are required to alter between release and debug mode it’s time to alter the Makefile.
1. First we have to get rid of those two flags in the CFLAGS section:
CFLAGS += -Wall -Werror -O3 -g3
Change it to
CFLAGS += -Wall -Werror
2. Next I got rid of this switch, which for our case is not necessary:
nrf51422_xxac_s130: OUTPUT_FILENAME := nrf51422_xxac_s130
nrf51422_xxac_s130: LINKER_SCRIPT=blinky_gcc_nrf51.ld

nrf51422_xxac_s130: $(BUILD_DIRECTORIES) $(OBJECTS)
    @echo Linking target: $(OUTPUT_FILENAME).out
    $(NO_ECHO)$(CC) $(LDFLAGS) $(OBJECTS) $(LIBS) -lm -o $(OUTPUT_BINARY_DIRECTORY)/$(OUTPUT_FILENAME).out
    $(NO_ECHO)$(MAKE) -f $(MAKEFILE_NAME) -C $(MAKEFILE_DIR) -e finalize
3. In the place where you deleted the nrf51422_xxac_s130 just add these switch statements:
# release switch
release: LINKER_SCRIPT=blinky_gcc_nrf51.ld

release: $(BUILD_DIRECTORIES) $(OBJECTS)
    @echo Linking target: $(OUTPUT_FILENAME).out
    $(NO_ECHO)$(CC) $(LDFLAGS) $(OBJECTS) $(LIBS) -lm -o $(OUTPUT_BINARY_DIRECTORY)/$(OUTPUT_FILENAME).out
    $(NO_ECHO)$(MAKE) -f $(MAKEFILE_NAME) -C $(MAKEFILE_DIR) -e finalize

release:  CFLAGS +=  -O3
release:  ASMFLAGS += -O3

# debug switch
debug: LINKER_SCRIPT=blinky_gcc_nrf51.ld

debug: $(BUILD_DIRECTORIES) $(OBJECTS)
    @echo Linking target: $(OUTPUT_FILENAME).out
    $(CC) $(LDFLAGS) $(OBJECTS) $(LIBS) -lm -o $(OUTPUT_BINARY_DIRECTORY)/$(OUTPUT_FILENAME).out
    $(MAKE) -f $(MAKEFILE_NAME) -C $(MAKEFILE_DIR) -e finalize

debug:    CFLAGS += -DDEBUG -gdwarf-2 -g3 -O0
debug:    ASMFLAGS += -DDEBUG -gdwarf-2 -g3 -O0
4. And finally change these lines:
#default target - first one defined
default: clean nrf51422_xxac_s130

#building all targets
all: clean
    $(NO_ECHO)$(MAKE) -f $(MAKEFILE_NAME) -C $(MAKEFILE_DIR) -e cleanobj
    $(NO_ECHO)$(MAKE) -f $(MAKEFILE_NAME) -C $(MAKEFILE_DIR) -e nrf51422_xxac_s130
To
#default target - first one defined
default: clean release

#building all targets
all: clean
    $(NO_ECHO)$(MAKE) -f $(MAKEFILE_NAME) -C $(MAKEFILE_DIR) -e cleanobj
    $(NO_ECHO)$(MAKE) -f $(MAKEFILE_NAME) -C $(MAKEFILE_DIR) -e debug
    $(NO_ECHO)$(MAKE) -f $(MAKEFILE_NAME) -C $(MAKEFILE_DIR) -e release
Basically we just specified that by default, make command will compile the release version and also it deletes the previous compiled files.
That’s all we have to do to switch between release and debug mode. You can try that out, by executing the following commands where your makefile is located:
-
make
-
make release
-
make debug
make and make release will both compile release version.
And final note, just to be very neat about this, you can also change the help switch to include that we have a release and a debug mode:
#target for printing all targets
help:
    @echo following targets are available:
    @echo   release
    @echo   debug
    @echo   flash_softdevice
Convenient OpenOCD functions
If you’ll be using jLink, feel free to skip this section
Now that we have a switch between release and debug mode, wouldn’t it be convenient to be able to flash the µC with your firmware, or to erase it? In this section I’ll show you how I added the following function to my makefile:
-
flash – for flashing your compiled firmware
-
flash_softdevice – for flashing the S130 softdevice on the controller
-
flash_erase – erasing all flash contents
-
debug_server – for easy way of starting the OpenOCD, which will be later used for Qt
To be honest there is no magic regarding adding these function. Mainly due to Makefile being a way of describing the terminal what commands in what order should be ran. And in this case instead of running GCC or G++ we will just run the OpenOCD commands.
Nonetheless to be able to flash the nRF51 with OpenOCD you’ll need the config file which is included in the download. Other than that it’s pretty straight forward.
First delete these at the end of your makefile:
flash: nrf51422_xxac_s130
    @echo Flashing: $(OUTPUT_BINARY_DIRECTORY)/$<.hex
    nrfjprog --program $(OUTPUT_BINARY_DIRECTORY)/$<.hex -f nrf51  --sectorerase
    nrfjprog --reset -f nrf51

## Flash softdevice
flash_softdevice:
    @echo Flashing: s130_nrf51_2.0.0_softdevice.hex
    nrfjprog --program ../../../../../../components/softdevice/s130/hex/s130_nrf51_2.0.0_softdevice.hex -f nrf51 --chiperase
    nrfjprog --reset -f nrf51
And replace them with these:
flash:
    @echo Flashing: $(OUTPUT_BINARY_DIRECTORY)/$(OUTPUT_FILENAME).hex
    openocd -f openocd.cfg -c "init ; reset halt ; program $(OUTPUT_BINARY_DIRECTORY)/$(OUTPUT_FILENAME).hex verify ; reset ; shutdown"

## Flash softdevice
flash_softdevice:
    @echo Flashing: s130_nrf51_2.0.0_softdevice.hex
    openocd -f openocd.cfg -c "init ; reset halt ; nrf51 mass_erase ; program ../sdk_11/components/softdevice/s130/hex/s130_nrf51_2.0.0_softdevice.hex verify ; reset ; shutdown"

flash_erase:
    @echo Erasing all flash memory. Including softdevice
    openocd -f openocd.cfg -c "init ; reset halt ; nrf51 mass_erase ; shutdown"

debug_server:
    @echo Starting OpenOCD debug debug_server
    openocd -f openocd.cfg
Also you can update your help target to include these commands. Mine now looks like this
#target for printing all targets
help:
    @echo following targets are available:
    @echo   release
    @echo   debug
    @echo   flash
    @echo   flash_softdevice
    @echo   flash_erase
    @echo   debug_server
In summary, if you run “make flash” it will execute the flash command, If you run “flash_softdevice” it will accordingly install softdevice on your controller and so on.
Importing Makefile project into Qt Creator
The nice thing about Qt Creator is not only that it can use it’s own qmake project or qbs files but it also support Makefile projects. Somehow I’ve managed to missed that, and before settling on importing in Qt Creator the nrf51 sample makefile project I tried codelite, geany and code::blocks, none of them were satisfactory to me. Codelite seemed decent though. Still, there is no place like home when it comes to Qt Creator, I guess you just get used to your IDE and all its shortcuts which makes it difficult to immediately switch to something else given the choice. And so far, in my extremely biased opinion I haven’t found a better and lighter alternative to Qt Creator for my C/C++ project needs.
Setting up New Project
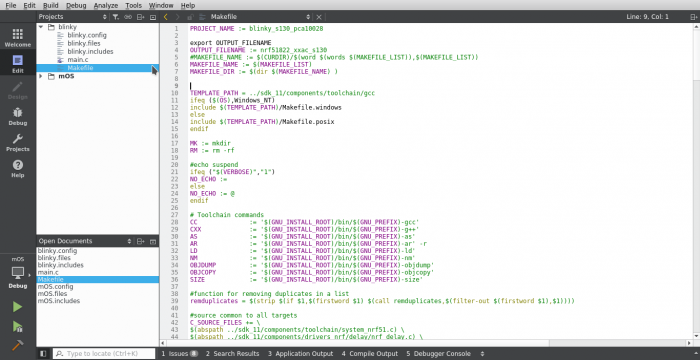
First things first, make sure you properly setup the project folder of the example. My blinky folder now looks like this:
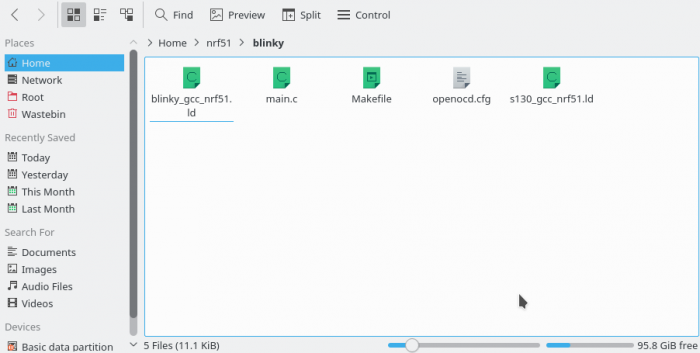
I have already edited the Makefile to reflect correctly where my sdk is in relation to it.
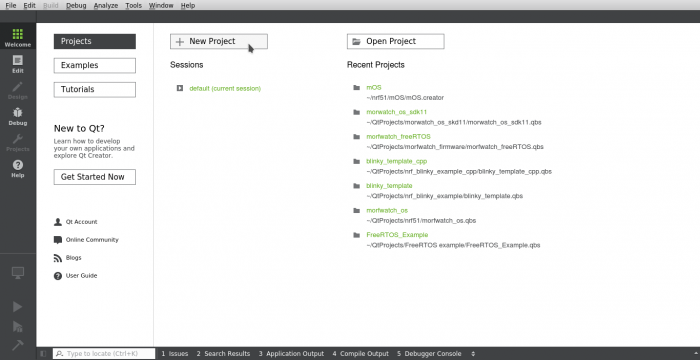
After we have our Makefile project setup, we can now import it in Qt Creator
1. Select “New Project”
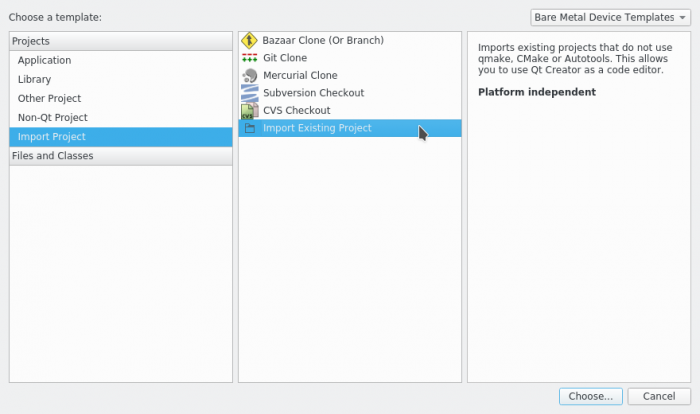
2. Then click “Import Project” and select “Import Existing Project”
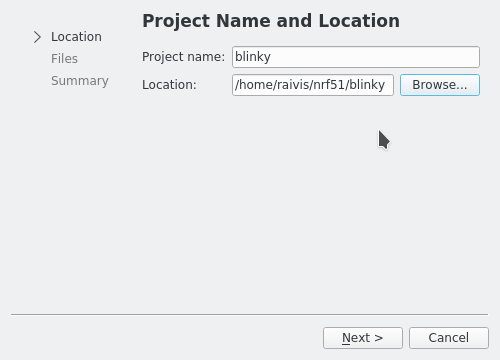
3. Specify the name of the project and set location to the folder where is your makefile projects
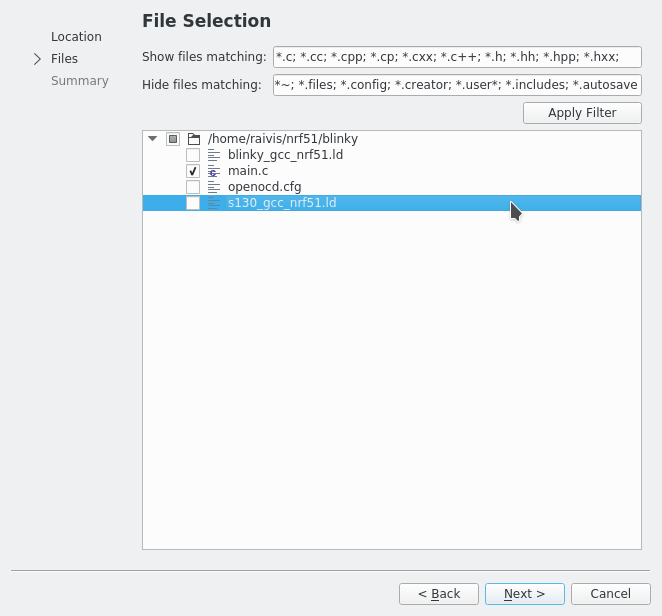
4. Specify which files you want to include in the project. It’s your choice whether you want to include linker files or not.
5. Select your version control if any, and select finish
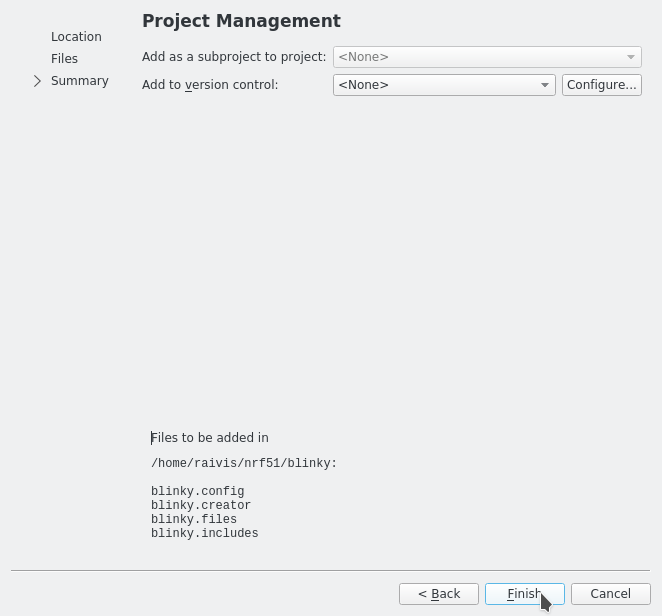
After completing the wizard Qt Creator will add 4 files to your project <project_name>.config, <project_name>.creator, <project_name>.files, <project_name>.includes. I’ll briefly glance over them and explain what they do and what you have to modify to have a properly integrated project in Qt Creator.
Configuring release and debug mode and uploading
First of all, I should mention that I have already setup the baremetal kit for my nrf51822, if you want to know how, please refer to my previous article about Qt Creator and QBS project. Those steps apply here as well.
Now that we have the project files imported it’s time to setup the Qt Creator to use our makefile with the release and debug targets accordingly. To do that, in the left side bar click “Projects”
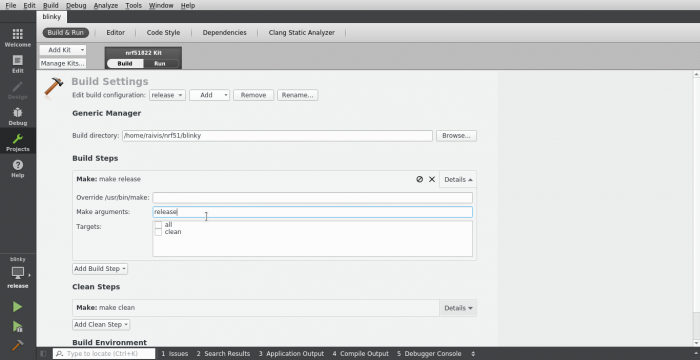
1. Rename the build configuration to “debug” and make sure “build directory” is pointing to where your makefile is
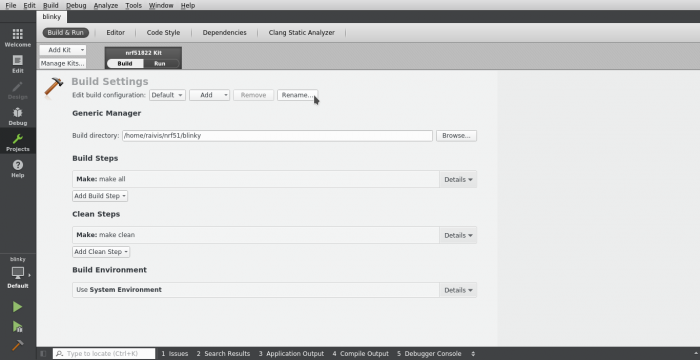
2. Change the make build steps to “make debug”, so Qt Creator knows how it should invoke our makefile

3. Now clone the debug version and call it “release”
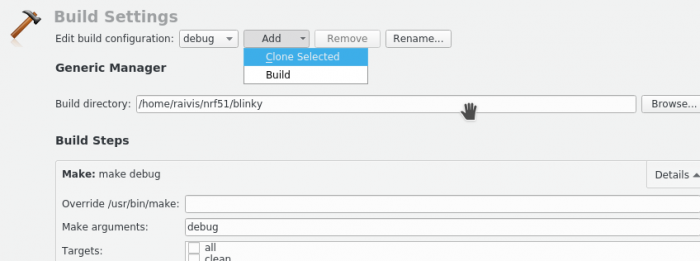
4. and change the make build steps to “make release”
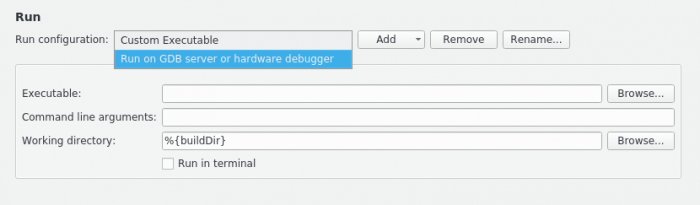
5. Then at the top select “Run” section and change “Run Configuration:” to “Run on GDB server or hardware debugger”
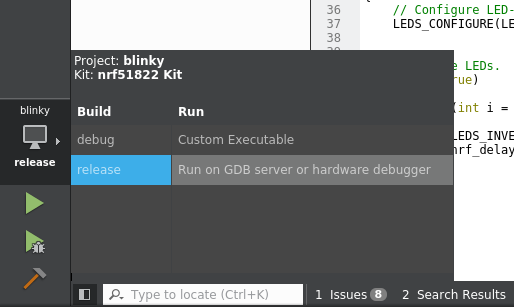
At this stage we have setup the compilation of our project. You can view the two modes underneath the project/kit popup:
Now you should be able to build your project from Qt Creator, by pressing “Ctrl+B” or the hammer icon at the bottom left corner
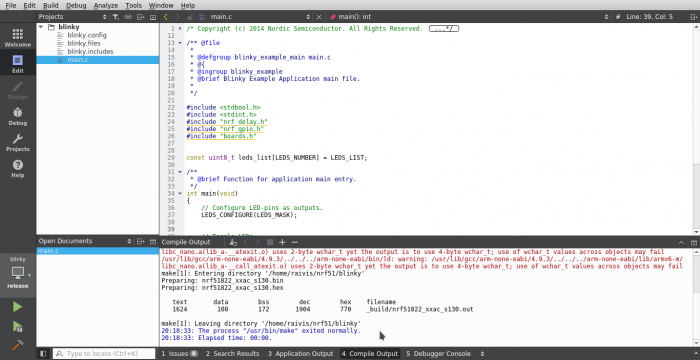
Here you go, the compilation was successful.
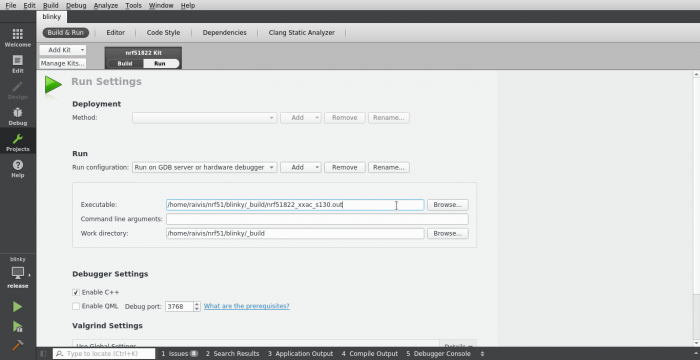
6. Now go back to “Projects” setting tab and again select for your kit “Run” and we have to specify which executable should be uploaded to our device. In our case that would be the *.out file
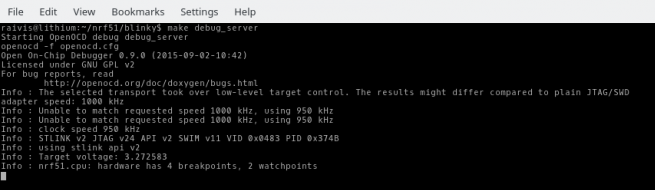
7. Now let’s set the Qt Creator to automatically upload the firmware to flash memory. I assume you have already configured the OpenOCD or jLink client in the Qt Creator. Before we run the application from Qt Creator we have to create the gdb server and connect to our micro-controller. That’s where we shall be using the “debug_server” target in our makefile. With your favourite terminal browse to the location of you makefile and execute “make debug_server”
8. And finally just run your application as you would normally do by pressing “Ctrl+R” or the green arrow icon:
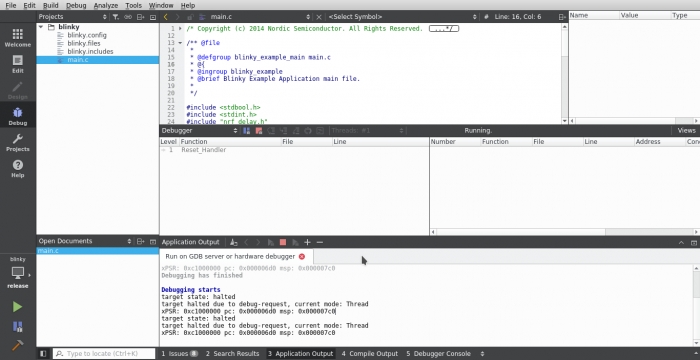
At this point, you have all the normal controls you’d expect and IDE to have. By selecting the debug version as our kit and starting the debugging by pressing F5, you can set your breakpoints and go through the code line by line as one would expect.
Finalizing the project configuration
Remember, that when we imported the makefile project it also added couple more files to the project. The idea of them is that for a generic project you have to manually specify which files belong to the project and which include directories or defines you are passing to the compiler. This is required so Qt Creator is able to perfectly replicate all the switches and code exclusions your compiler would do, basically enables you to properly browse the code.
.include file
Observant ones might have noticed that some of the includes in the example main.c file are underlined yellow:
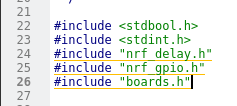
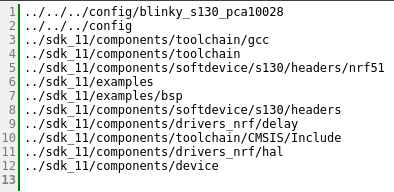
That is because Qt Creator doesn’t know where they are located and we just need to specify where are they. We already have done that in our makefile, and we just need to copy the includes from there in your <project_name>.include file. For the blinky example my blinky.include file looks like this:
.files file
The <project_name>.files file holds information of your source code. If you add more files to your makefile you should also add them here so Qt Creator is able to display them in the sidebar. At the moment if you followed exactly what I did regarding file importing in the previous step, you should only see “main.c” in there. I also like to add “Makefile” to the list so I can easily access it from the Qt Creator and edit it from the IDE.
.config file
The last file we have to manually edit is the <project_name>.config file. This one is used by Qt Creator to know what defines you have set for the compiler. Depending on the code you have, it might be very important to properly set the defines. Otherwise Qt Creator won’t know which pieces of code are active and this will be especially true when dealing with Nordic’s SDK, their defines switch between various code segments.
The defines should (like everything else) mirror what you have in the makefile, in my case the makefile CFLAGS consist of the following defines:
#flags common to all targets
CFLAGS  = -DBOARD_MWATCH21
CFLAGS += -DSOFTDEVICE_PRESENT
CFLAGS += -DNRF51
CFLAGS += -DS130
CFLAGS += -DBLE_STACK_SUPPORT_REQD
CFLAGS += -DBSP_DEFINES_ONLY
I just copied them over to the blinky.config file and added #define in front of them. The file should look something like this:
#define BOARD_MWATCH21
#define SOFTDEVICE_PRESENT
#define NRF51
#define S130
#define BLE_STACK_SUPPORT_REQD
#define BSP_DEFINES_ONLY
Conclusion
At this stage we have properly setup Qt Creator to use with our Makefile project. Just remember when you add any files to you project, you also have to manually add them to the Makefile and to the corresponding config file in the Qt. By following these principles any example provided by Nordic can be compiled and debugged inside Qt Creator. Only thing left to do is to add C++ compiler to the Makefile.
Enabling C++
As I mentioned in my previous article, I’m a bit of sucker for OOP and I prefer C++ over C any day. This section will be about what you have to change in Makefile to enable G++ compiler. If you want more detailed description how to write a hybrid C/C++ application please refer to my previous article here. I’m not going to cover it in detail, just what has to be added and changed in the makefile.
1. We have to add the G++ compiler to the makefile. Find this line:
CC := '$(GNU_INSTALL_ROOT)/bin/$(GNU_PREFIX)-gcc'
and afterwards add:
CXX := '$(GNU_INSTALL_ROOT)/bin/$(GNU_PREFIX)-g++'
2. In C_SOURCE_FILES delete:
$(abspath ../../../main.c) \
Then after the C_SOURCE_FILES add a new variable with your main.cpp file and all your other cpp files:
CPP_SOURCE_FILES += \
$(abspath ./main.cpp) \
$(abspath ./cpptest.cpp) \
3. Now we have to append the compiler flags for the G++ compiler. Find where are your CFLAGS variables, copy them and change the name of the copied version to CXXFLAGS. It should look something like this:
#flags common to all targets
CXXFLAGS  = -DBOARD_MWATCH21
CXXFLAGS += -DSOFTDEVICE_PRESENT
CXXFLAGS += -DNRF51
CXXFLAGS += -DS130
CXXFLAGS += -DBLE_STACK_SUPPORT_REQD
CXXFLAGS += -DBSP_DEFINES_ONLY
CXXFLAGS += -mcpu=cortex-m0
CXXFLAGS += -mthumb -mabi=aapcs
CXXFLAGS += -Wall -Werror
CXXFLAGS += -mfloat-abi=soft
# keep every function in separate section. This will allow linker to dump unused functions
CXXFLAGS += -ffunction-sections -fdata-sections -fno-strict-aliasing
CXXFLAGS += -fno-builtin --short-enums
4. Now find the following entries:
C_SOURCE_FILE_NAMES = $(notdir $(C_SOURCE_FILES))
C_PATHS = $(call remduplicates, $(dir $(C_SOURCE_FILES) ) )
C_OBJECTS = $(addprefix $(OBJECT_DIRECTORY)/, $(C_SOURCE_FILE_NAMES:.c=.o) )
And add these lines after them:
CPP_SOURCE_FILE_NAMES = $(notdir $(CPP_SOURCE_FILES))
CPP_PATHS = $(call remduplicates, $(dir $(CPP_SOURCE_FILES) ) )
CPP_OBJECTS = $(addprefix $(OBJECT_DIRECTORY)/, $(CPP_SOURCE_FILE_NAMES:.cpp=.o) )
5. Once again find this line:
vpath %.c $(C_PATHS)
and as before add:
vpath %.cpp $(CPP_PATHS)
6. Find and replace this
OBJECTS = $(C_OBJECTS) $(ASM_OBJECTS)
with this:
OBJECTS = $(CPP_OBJECTS) $(C_OBJECTS) $(ASM_OBJECTS)
7. Now the interesting part, because GCC doesn’t know how to link C with C++ we have to change the linker to be G++ or in our case CXX. For both debug and release target, change CC in these lines:
$(NO_ECHO)$(CC) $(LDFLAGS) $(OBJECTS) $(LIBS) -lm -o $(OUTPUT_BINARY_DIRECTORY)/$(OUTPUT_FILENAME).out
to CXX:
$(CXX) $(LDFLAGS) $(OBJECTS) $(LIBS) -lm -o $(OUTPUT_BINARY_DIRECTORY)/$(OUTPUT_FILENAME).out
8. Let’s not forget the compiler flags for G++ for both release and debug version:
release:  CXXLAGS +=  -O3
debug:    CXXFLAGS += -gdwarf-2 -g3 -O0
9. Now we have to add compiler rule for CPP. Find these lines:
# Create objects from C SRC files
$(OBJECT_DIRECTORY)/%.o: %.c
        @echo Compiling file: $(notdir $<)
        $(NO_ECHO)$(CC) $(CFLAGS) $(INC_PATHS) -c -o $@ $<
and append these after them, so makefile knows what to do with the cpp files:
# Create objects from CPP SRC files
$(OBJECT_DIRECTORY)/%.o: %.cpp
        @echo Compiling file: $(notdir $<)
        $(NO_ECHO)$(CXX) $(CXXFLAGS) $(INC_PATHS) -c -o $@ $<
10. And finally find these lines:
# Link
$(OUTPUT_BINARY_DIRECTORY)/$(OUTPUT_FILENAME).out: $(BUILD_DIRECTORIES) $(OBJECTS)
        @echo Linking target: $(OUTPUT_FILENAME).out
        $(NO_ECHO)$(CC) $(LDFLAGS) $(OBJECTS) $(LIBS) -lm -o $(OUTPUT_BINARY_DIRECTORY)/$(OUTPUT_FILENAME).out
Change them so the linking is done via CXX:
# Link
$(OUTPUT_BINARY_DIRECTORY)/$(OUTPUT_FILENAME).out: $(BUILD_DIRECTORIES) $(OBJECTS)
        @echo Linking target: $(OUTPUT_FILENAME).out
        $(NO_ECHO)$(CXX) $(LDFLAGS) $(OBJECTS) $(LIBS) -lm -o $(OUTPUT_BINARY_DIRECTORY)/$(OUTPUT_FILENAME).out
And that’s it, you have modified the Makefile to be able to use both C and CPP files in your project
Testing hybrid C/C++ firmware
Now that we can compile both C and C++ source files, it’s time to test it. Remember we deleted the main.c file from the makefile and changed the linker script to G++ which will ask that the int main(void) {} function is part of C++. This is how my main.cpp file now looks:
#include <stdbool.h>
#include <stdint.h>
extern "C" {
        #include "nrf_delay.h"
        #include "nrf_gpio.h"
        #include "boards.h"
}
#include "cpptest.h"
const uint8_t leds_list[LEDS_NUMBER] = LEDS_LIST;
/**
 * @brief Function for application main entry.
 */
int main(void)
{
    // Configure LED-pins as outputs.
    LEDS_CONFIGURE(LEDS_MASK);
    LedWrapper *led = new LedWrapper();
    led->test();
    // Toggle LEDs.
    while (1)
    {
        for (int i = 0; i < LEDS_NUMBER; i++)
        {
            LEDS_INVERT(1 << leds_list[i]);
            nrf_delay_ms(200);
        }
    }
}
If you want to know, why I have used extern for some includes refer to my previous article here. (I’ve said that already too many times, stealthy self promotion I guess)
You should also notice I’ve added a simple class as a test. It will just turn on an LED for 5 seconds and then return from the method, nothing special. We are more interested whether classes function.
In any case, once you have the main in C++ source file just hit compile and enjoy a hybrid firmware.
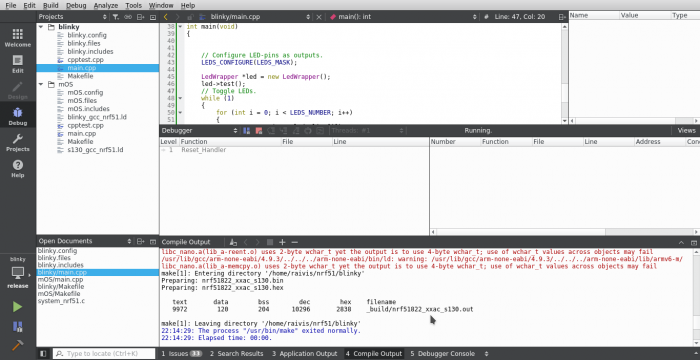
Look at that, compiles and works!
Downloads
Makefile Project files: Download: blinky_makefile_qt.zip (7.60K)
References
Optimize options - using the GNU compiler collection (GCC) (no date) Available at: https://gcc.gnu.org/onlinedocs/gcc/Optimize-Options.html (Accessed: 2 June 2016).
Debugging options - using the GNU compiler collection (GCC) (no date) Available at: https://gcc.gnu.org/onlinedocs/gcc/Debugging-Options.html (Accessed: 2 June 2016).
HardRock (2014) ??????????????? STM32 ??? Linux ? CodeLite IDE -> ????? ?? ??????????.??. Available at: http://forum.sources.ru/index.php?showtopic=387685 (Accessed: 2 June 2016).
Ltd, T.Q.C. (2016) Setting up a generic project. Available at: http://doc.qt.io/qtcreator/creator-project-generic.html (Accessed: 2 June 2016).