With the recent personal data leaks regarding celebrities, I noticed that I’ve some data on my cloud storage which should have an extra layer of protection. And NO, I don’t have any private pictures, but a document or two with some very sensitive data. You never know when you might be a victim of phishing or from a weak password. In any case, I decided to investigate some encryption algorithms. More precisely, XOR cipher, Feistel cipher and blowfish. In this article I’ll try to give some guidelines regarding these ciphers and example implementation in C++ with Qt. This article should be structured and written in a way, if you don’t know anything about cryptography, at the end you should understand most of the basic underlying theories. Also each algorithm will be introduced in a sequence where the next algorithm described will reference to previous one. Note that the intention of this article is to explain how to use them, rather than analyze their security etc.
XOR cipher
Let’s start with the most basic cipher. Basically, XOR cipher is an additive type cipher. This cipher allows you to just apply the key to the data to encrypt it, and reapply the same key to encrypted data to decrypt it.
It operates on the following principles:
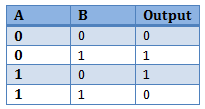
Here is XOR truth table, just in case you’ve forgotten it:
Let me try and explain those principles. First let’s assume the following things:
- A is original data
- B is our key
- C is out encrypted data
For now let’s ignore the first two equations, and examine the 3rd one. Basically, it states that original data XORed with our key and then XORed with the encrypted data is equal to our key XORed with encrypted data and then with original data. From that principle we can derive following two equations:
Let’s say we substitute C from 2nd derivation in the 1st derived equation, and we get the following (this is basically the 4thprinciple):
Note the highlighted part of equation, which according to our principles would be equal to 0, and then we would be left with:
The equation now is exactly as our 1st principle. And we proved that XORing the key with encrypted data will give us the original data.
This works both ways, also substituting A in our 2nd derived equation. If you wish, feel free to do it on your own.
One of the magic’s of XOR is that it can be also represented the following way:
Hence, sometimes this algorithm is called modulus 2 addition, and the algorithm can be represented like this as well:
Where β = encrypted data, α = raw data and γ = key
Example
At this stage, we should be more or less in grasp with the theory and we can try to do some basic encryption and code implementation.
For example, let’s say we want to encode “Morf” which in ASCII translates to – 01001101, 01101111, 01110010 and 01100110. Let’s say we have a very simple 2 byte key – 01110010 10010011
The encoding would look something like this:
Note the “bad choice” of key, how letter ‘r’ produced 0
And decryption of the data would look like this:
As you can see the decrypted data is just as our original data. Ideally we could have the key to be as long as our data which would make the encryption to be much safer than using a repetitive key. But such conditions in real life might not be possible to meet. XOR encryption main advantage is the simplicity of implementation and super low memory requirements, which enables it to be used in small 8bit microcontrollers. However, this encryption is vulnerable to known-plaintext attack (KPA). Basically if you have a copy of encrypted data and raw data you are able to derive the key. Due to the simplicity it is commonly used to hide information where no particular security is required and most likely needs small footprint on memory.
You can download the sample application and source code at the end of article, which includes this simple XOR cipher.
Ideal Block Cipher
A block cipher is basically a method for taking N bits from plaintext and replacing them with N bits from ciphertext. In an ideal block cipher the relationship between the original N bits and the ciphertext N bits are completely random. Furthermore, they must be invertible, so it has to be one-to-one mapped. In other words, each input block is mapped to a unique output block. The encryption key in an ideal block cipher is the codebook itself, a table with all the possibilities to map input block to the output block. Note that, in an ideal block cipher the codebook will need to be 2N big to contain all the possible mapping conversion.
For example, let’s say we have block size of 4 bits. This would mean that we have to have 24 = 16 integers in our codebook. Let’s say we have an input of 0000 which we map to integer 5. The number 5 is chosen randomly, as it was stated above, the codebook must have random mapping. Afterwards, we convert the number 5 back to 4 bit block, which would be 1100 and this is our ciphertext. Now if we wanted to reverse the encryption, we would take our ciphertext 1100 and map it to 5, and from there we can map 5 to 0000 in plaintext.
At this point I’d like to ask two questions about the example:
- How many bits the codebook consists of when block size is 4 bits? A: N*2N = 4 * 16 = 64
- How many keys are possible when block size is 4 bits? A: 16! = 2.1*1013
See figure 1 for ideal block cipher with block size of 4.
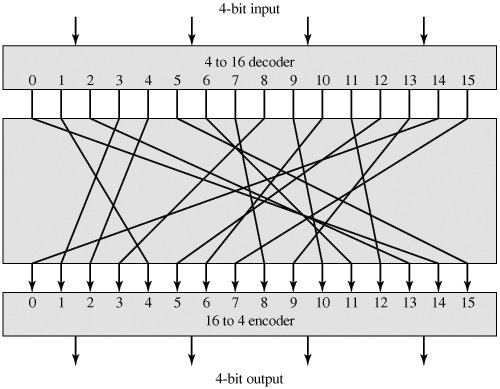 Figure 1: 4 bit long block cipher with codebook of length 16.
Taken from Cryptography and Network Security (4th Edition) by William Stallings
Now that you’ve understood what an ideal block cipher is, you probably can already see a problem with using small block sizes being susceptible to statistical attacks. Consider 64 bit block encryption. For each input block there would be 264integers in our codebook that means the codebook (key) would need to have length of 64* 264 = 1021 bits = 1011 GB
The size of encryption key would make the ideal block cipher very impractical. Even storing the key would take “a lot” of space, not even mentioning transmitting the key over network and processing time.
Feistel Cipher
The solution to the immensely large key is to approximate the ideal block cipher by using the concept of product cipher, which is execution of two or more ciphers in sequence in such a way that result is cryptographically stronger than any of the component ciphers. Basically the idea is to develop a block cipher with a key length of k bits and block length of n bits, which would provide us with 2k possible keys instead of 2n!
One such cipher was proposed by IBM cryptographer Horst Feistel, hence the name Feistel cipher. Feistel cipher uses the same basic algorithm for both encryption and decryption, were in most cases the key is just inverted for decryption. As you can see in figure 2, the Feistel cipher consists of multiple rounds of processing of the plaintext with each round consisting of a “substitution” step followed by a permutation step.
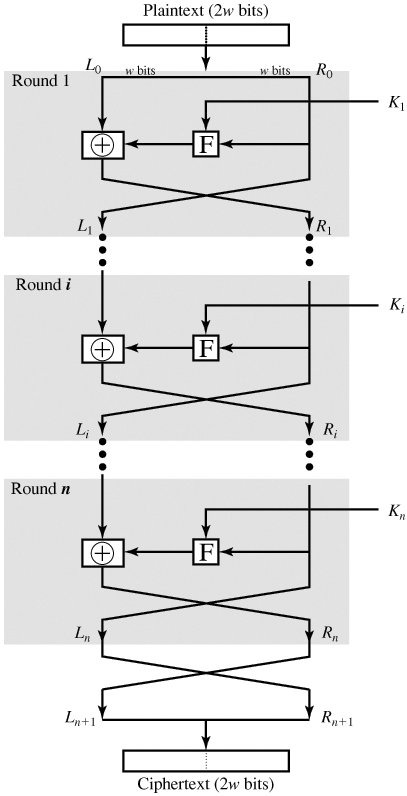 Figure 2: Feistel structure for symmetric key cryptography.
Taken from Cryptography and Network Security (4th Edition) by William Stallings
As you can see in the figure 2, the input block (plaintext) is divided into two halves L and R for the left and right half. In each round the R half goes unchanged and becomes the L half for the next round. However, the L half goes through an operation that depends on R half and the key, which will be the R half for the next round.
Note that there is another swap at the end.
Mathematical description of encryption
Let’s say LEi and REi are the output for the ith round. The letter E specifies that it is encryption value. So the mathematical description between current round the ith round and previous round the (i-1)th round would be as following:
F is the Feistel function, obviously named after Horst Feistel. This function can be almost anything to scramble the data and neat thing about Feistel Cipher is that Feistel function doesn’t need to be reversible, which I’ll show you why it is so later.
Also, don’t worry about the Feistel function as of now. Intention of this section is just to understand the principle of Feistel Cipher and later we will implement blowfish cipher, which is a specific Feistel cipher, where the F function will be provided.
Typically there are 16 rounds in Feistel Cipher, so the output of the last round would be as follows:
Decryption in Feistel Cipher
As shown in figure 3, the algorithm for decrypting is exactly the same, except we use the keys in reverse orders. Because of this we had to have the last swap. So we can have the output of each round during decryption to be equal to the input of the corresponding round during encryption. Note, that this property is true regardless of the F function.
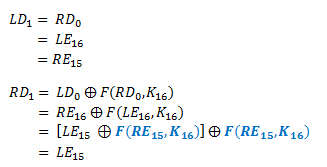
To prove the above claim, let LDi and RDi be the left and right half of the output of the ithround. “D” specifies that it is the decryption value. So the output of first decryption round consists of LD1 and RD1 and the input would be LD0 and RD0. And we already know the following:
By following the diagram, we can derive the following equation for the first decryption round:
Remember the first two XOR principles mentioned in XOR cipher section:
You should see that due to these principle the Feistel function cancels out and we show that the output of the first round of decryption is the same as the input to the last stage of encryption: LD1 = RE15 and RD1 = LE15. Hence, the F function doesn’t need to be reversible.
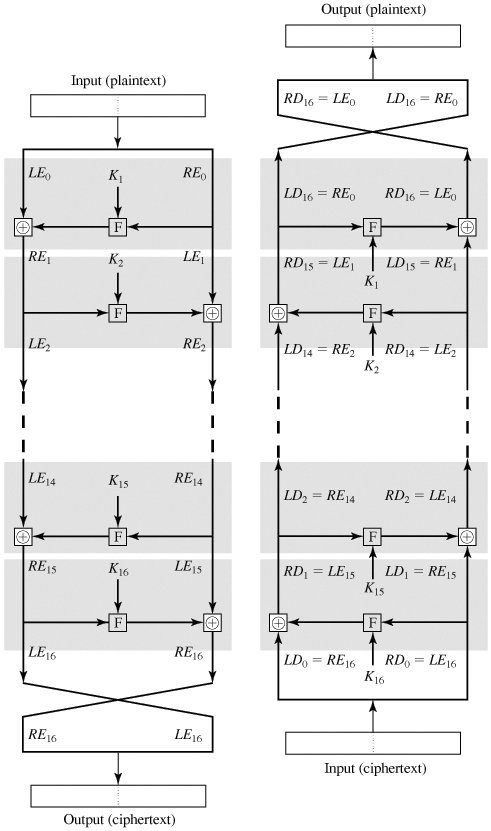 Figure 3: In a Feistel cipher, encryption works the same as decryption.
Taken from Cryptography and Network Security (4th Edition) by William Stallings
Blowfish cipher
As briefly mentioned before, blowfish cipher is a Feistel cipher, more precisely it consists of 16 rounds and the key can be any length up 448 bits. This algorithm was developed by Bruce Schneier, and he has been kind of now to release this algorithm in public domain, which means that it can be freely used by anyone in any type of application. This algorithm was constructed as an alternative to the aging DES encryption algorithm, which is quite similar. However, compared to DES, blowfish has key-dependent S-boxes and slightly more complicated initialization process.
An S-box in cryptography is like a lookup table to perform substation. In general an S-Box takes some number of input bits, M and transforms them into some random number with N bits. Typically an MxN S-box is implemented as lookup table with 2M words of N bits each, normally fixed tables are used, however not in case of blowfish algorithm which will generate the table dynamically as we will see later on.
An example of fixed lookup table 6x4 bit S-box from DES(S5)
For example, if our input is “01 1011” which has outer bits “01” and inner bits “1101”, the corresponding output would be “1001”.
So blowfish consists of two parts: key-expansion and data encryption. During the key expansion part, the key is converted into several subkey arrays which will total to 4168 bytes. There is a P-array which is eighteen 32bit boxes and S boxes, which are four 256 boxes. All of these boxes are initialized with some random sequence of hexadecimal digits; however it is commonly initialized with the digits from Pi (less the number 3). But it can be any random sequence you desire, it’s just Pi can be derived by calculating and it seems random enough. All operations within blowfish algorithm consist of XORs and additions, which make the algorithm very fast on a modern microprocessor with large cache. The only additional operations are four indexed array data lookups per round.
Generating the subkeys
The subkeys are calculated the following way using blowfish:
- Initialize the P and S-boxes with the hexadecimal digits of Pi (less the initial 3) or any other random sequence. For example with pi: P1 = 0x243f6a88, P2 = 0x85a308d3, P3 = 0x13198a2e etc.
- XOR P1 with the first 32 bits of the key, XOR P2 with the second 32 bits of the key and so on until you have XORed all the P array. The key is just cycled through.

- Encrypt all zero string with the blowfish algorithm, using the P-array subkeys derived in steps 1 and 2.
- Replace P1 and P2 with the output of step 3
- Encrypt the output of step 3 using blowfish algorithm
- Replace P3 and P4 with the output from step 5
- Continue this process until all P-array is replaced and then continue the same process with the encryption values left from generating P-array to replace all S-boxes
Feistel cipher – data encryption
The Feistel cipher for blowfish algorithm barely differs from the original one. Instead of key (K) you’ll have to XOR the left side of data with Pi before running it through Feistel function. If you are careful observer you might notice in Figure 4, that even though blowfish is 16 round Feistel network, it has 18 P values, where at the very end both data sides are XORed with P17 and P18.
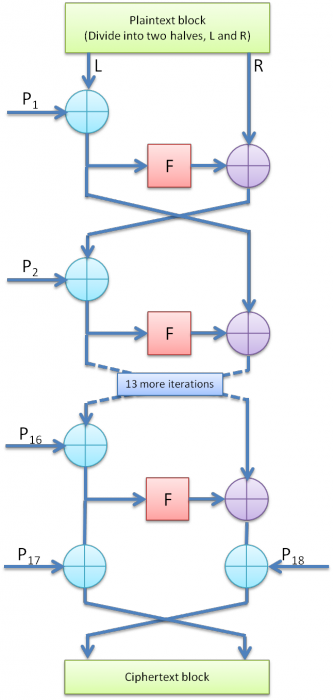 Figure 4: Blowfish encryption Feistel diagram.
Pseudo code of the algorithm above would be as follows:
Divide x into two 32-bit halves: xL, xR
For i = 1 to 16:
xL = xL XOR Pi
xR = F(xL) XOR xR
Swap xL and xR
Next i
Swap xL and xR (Undo the last swap.)
xR = xR XOR P17
xL = xL XOR P18
Recombine xL and xR
An excerpt from Bruce Schneier’s blog
As you already should now, decryption is the same as encryption, except the P values are used in reverse from P18 to P1. Feel free to go through the same reverse process we did for general Feistel algorithm, to see how each individual step for decryption will equal the reverse encryption step.
Blowfish Feistel function
One final thing we have to implement for any Feistel network is the Feistel function. Which also is the last thing standing in your way to have all the necessary parts to implement blowfish algorithm.
As it was mentioned briefly in the introduction about blowfish, the algorithm consists of 4 S-boxes each with 256 entries. Just like for DES encryption algorithm, blowfish uses these to substitute and further obstruct the input data. However, remember our initialization process, compared to DES encryption Blowfish will generate S-boxes which are dependent on the key, which further enhances the security of the algorithm. And once again remember, the Feistel function doesn’t need to be reversible, because of this property the function can be almost anything.
So in case of Blowfish the Feistel function divides the input of 32 bits into 4 8bit chunks, which will be used to lookup the corresponding S-box value. Also in the meantime it will use those S-box values to further scramble the data. See figure 5 for graphical representation of F function.
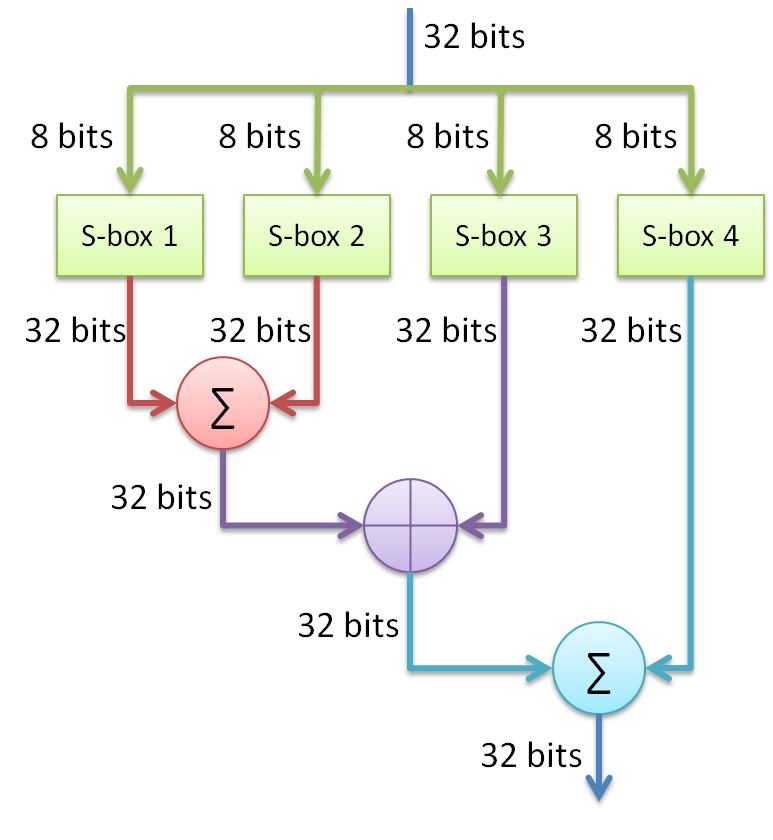 Figure 5: Graphical representation of Blowfish’s F function
Code implementation
At this point we are ready to implement blowfish algorithm. For my convenience I’ll be implementing it with Qt library. It should be relatively easy to translate to pure C++ where you only use STL libraries.
The first thing we need is to either make a function which computes Pi values or a premade class which consists of 1042 32bit Pi values. In my case I reused a class provided by another project which has implemented blowfish which is available in github. Feel free to reuse the class or write an algorithm to compute Pi. Now that we have Pi values, we need to initialize the P array and S-boxes with the Pi values (or any other random sequence of numbers).
void QBlowfish::initBoxes()
{
    //Initialize P boxes
    for(int i=0; i<18; i++)
        P[i] = hexPi.Pi[i];

    //Initialize S boxes
    int i = 18;
    for(int b=0; b<4; b++)
        for(int j=0; j<256; j++)
            S[b][j] = hexPi.Pi[i++];

}
Now we need to generate/update the P box and S-boxes depending on our key. For this we will make a function which accepts string as a key. Note that it doesn’t necessarily need to be user readable string, it can be any combination of bytes, and we do it just for our convenience. However we can’t normally directly use our ASCII or even Unicode string with the boxes, we need to convert the string in 32 bit chunks.
After we have the key represented in 32 bit chunks, we can then proceed with box generation. See full key expansion code down below with blowfish encryption and decryption methods:
void QBlowfish::calcSubKey(QString keyStr)
{
    if(keyStr.length() < 4){
        qDebug() << "Key must be at least 32 bits long";
        return;
    }

    initBoxes();

    int keyLength = qCeil(keyStr.length()/4.0);

    quint32 key[keyLength];
    quint32 *ptr = &key[0];
    for(int i=0; i<keyStr.length(); i+=4){
        quint32 tempKey = 0;
        tempKey |= (quint8(keyStr[i].unicode()) << 24);
        if(i+1 < keyStr.length()) tempKey |= (quint8(keyStr[i+1].unicode()) << 16);
        if(i+2 < keyStr.length()) tempKey |= (quint8(keyStr[i+2].unicode()) << 8);
        if(i+3 < keyStr.length()) tempKey |= quint8(keyStr[i+3].unicode());
        *ptr = tempKey;
        qDebug() << *ptr;
        ptr++;
    }

    for(int i=0; i<18; i++){
        P[i] ^= key[i%keyLength];
    }
    quint32 L = 0, R = 0;
    for(int i=0; i<18; i+=2){
        _encyrpt(L, R);
        P[i] = L;
        P[i+1] = R;
    }

    for(int i=0; i<4; i++)
        for(int j=0; j<256; j+=2){
            _encyrpt(L, R);
            S[i][j] = L;
            S[i][j+1] = R;
        }
}
quint32 QBlowfish::f(quint32 x)
{
    quint32 h = S[0][x>>24] + S[1][x >> 16 & 0xff];
    return ( h ^ S[2][x >> 8 & 0xff]) + S[3][x & 0xff];
}
void QBlowfish::_encyrpt(quint32 &L, quint32 &R)
{
    for(int i=0; i<16; i+=2){
        L ^= P[i];
        R ^= f(L);
        R ^= P[i+1];
        L ^= f(R);
    }
    L ^= P[16];
    R ^= P[17];

    qSwap( L, R );
}

void QBlowfish::_decrypt(quint32 &L, quint32 &R)
{
    for(int i=16; i>0; i-=2){
        L ^= P[i+1];
        R ^= f(L);
        R ^= P[i];
        L ^= f(R);
    }

    L ^= P[1];
    R ^= P[0];

    qSwap( L, R);
}
At this point we already have fully implemented Blowfish algorithm. We are able to use encrypt and decrypt function to transform our data. However, as you can see the parameters as of now, accept two 32 bit chunks of data for the left and right side. To make the encryption/decryption more convenient we can construct methods for encryption and decryption to accept data of any length and we can automatically split the plaintext in 64bit blocks with 32 bit left and 32 bit right blocks.
So first let’s construct a method which will get 32 bits from byte array from a specific position. Also if from the given position we can’t have 32 bits from the input data, we can just shift in 0s to make the 32 bit batch.
quint32 QBlowfish::get32Batch(QByteArray data, uint startVal)
{
    quint32 result = 0;
    for(int i=startVal; i<startVal+4; i++)
    {
        result <<= 8;
        if(i < data.length())
            result |= data[i]&0xFF;
    }

    return result;
}
Now that we have our method for getting a 32 bit chunks from our data, we can now implement a function which will automatically split input data in 64 bit chunks and encrypt whole byte array with blowfish:
QByteArray QBlowfish::encrypt(QByteArray data)
{
    QByteArray cryptedData;

    for(int i = 0; i < data.length(); i+=8)
    {
        quint32 L = get32Batch(data, i);
        quint32 R = get32Batch(data, i+4);
        _encyrpt(L, R);
        cryptedData.append( convertToChar(L, R) );
    }

    return cryptedData;
}
Note there is another function being called after blowfish encryption convertToChar. Because QByteArray as the name implies is an array of bytes we can’t directly append 32 bit chunks to the byte array, we need to split the results in 8 bit chunks. Here is the function to do exactly that:
QByteArray QBlowfish::convertToChar(quint32 L, quint32 R)
{
    QByteArray result;

    result.append( char( (L >> 24) & 0xFF ) );
    result.append( char( (L >> 16) & 0xFF)  );
    result.append( char( (L >> 8) & 0xFF) );
    result.append( char( L & 0xFF ) );

    result.append( char((R >> 24) & 0xFF)  ) ;
    result.append( char((R >> 16) & 0xFF ) );
    result.append( char((R >> 8) & 0xFF ) );
    result.append(char( R & 0xFF ) );

    return result;
}
And decryption is basically the same as encryption when it comes to splitting the input data in 64 bit chunks:
QByteArray QBlowfish::decrypt(QByteArray cryptedData)
{
    QByteArray data;
    for(int i = 0; i < cryptedData.length(); i+=8)
    {
        quint32 L = get32Batch(cryptedData, i);
        quint32 R = get32Batch(cryptedData, i+4);
        _decrypt(L, R);
        data.append( convertToChar(L, R) );
    }


    return data;
}
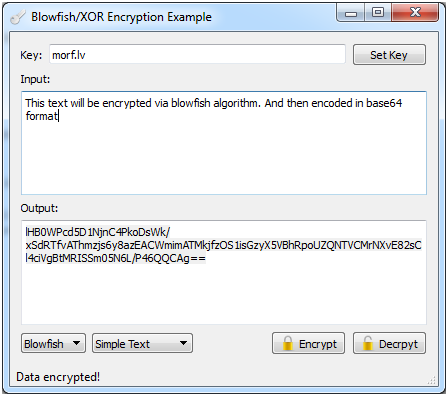
Results:
Encryption in action:
Decryption in action:
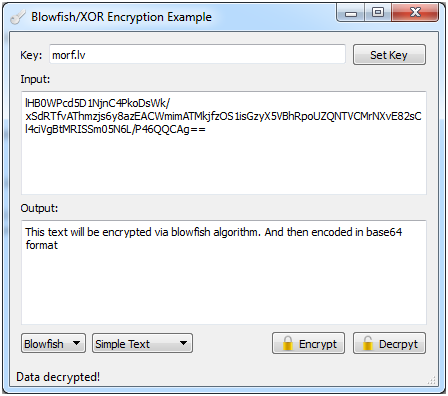
Feel free to download the sample application and play around with it.
Conclusion
We have successfully implemented Blowfish encryption algorithm in C++. To be able to do so, you should now have fair understanding on the underlying mathematics behind simple XOR encryption and more sophisticated Feistel network like blowfish. And because of this understanding, it gives you the ability to implement all of these algorithms on any system or architecture you would have a need for. However, even though Blowfish is rather strong algorithm, but because of set of weak keys there have been multiple algorithms proposed which are even stronger, but similar like twofish or threefish. Also now the defacto standard is to use AES algorithm. This introduction should be good enough start to move on to even more advanced algorithms. One final thing, I would highly recommend reading through Bruce Schneier’s blog about Blowfish, where he explains design decisions, a lot of improvements and simplifications you can implement and analysis of the algorithm.
Files:
The source files include the XOR cipher and Blowfish cipher.
Source is available on github: https://github.com/xcoder123/QBlowfish
You can download the binary either from github or from my server Download: QBlowfish_bin.zip (17.71M)
And finally, this article is also available as PDF: Download: introduction_to_data_encryption.pdf (1.37M)
References
Allison, K., Feldman, K. & Mick, E., 2012. Blowfish. [Online]
Available at: http://www.cs.rit.edu/~ksf6458/cryptography/Final.pdf
[Accessed 17 September 2014].
Anon., n.d. BLOWFISHENC: Blowfish Encryption Algorithm. [Online]
Available at: http://iitd.vlab.co.in/?sub=66&brch=184&sim=1147&cnt=1
[Accessed 15 September 2014].
Kak, A., 2014. College Of Engineering - Purdue university. [Online]
Available at: https://engineering.purdue.edu/kak/compsec/NewLectures/Lecture3.pdf
[Accessed 15 September 2014].
Schneier, B., n.d. Description of a New Variable-Length Key, 64-Bit Block Cipher (Blowfish). [Online]
Available at: https://www.schneier.com/paper-blowfish-fse.html
[Accessed 15 September 2014].
Stallings, W., 2005. Cryptography and Network Security (4th Edition). bez viet.:Prentice Hall; 4 edition (November 26, 2005).


